如何实现 React-redux
示例 demo:github
注意:为了简单明了的展示主要流程,下面示例中均会省略异常情况的处理。
一、什么是 react-redux?
react-redux是 redux 的中间件,通过 connect和Provider这两个 api,将组件需要的状态注入进去,当 redux 里的状态发生改变时,触发相应组件的更新
二、react-redux 是怎么工作的?
先看一个简单的用例
import React from "react";
import ReactDOM from "react-dom";
import App from "./App";
import reducers from "./reducers";
import { createStore } from "redux";
import { Provider } from "react-redux";

const store = createStore(reducers);

ReactDOM.render(
  <React.StrictMode>
    <Provider store={store}>
      <App />
    </Provider>
  </React.StrictMode>,
  document.getElementById("root")
);
最外层Provider将整个应用包裹住
将createStore返回的store通过props传递给Provider
store 并不是 redux 存储的状态,要获得存储的状态必须通过store.getState()
import React, { Component } from "react";
import { dispatchAdd, dispatchReduce } from "./actions";
import { connect } from "react-redux";

class Counter extends component {
  render() {
    return <div>{this.props.counter}</div>;
  }
}

const mapStateToProps = function (state, ownProps) {
  return {
    counter: state.counter,
  };
};

const mapDispatchToProps = function (dispatch, ownProps) {
  return {
    add: dispatch(dispatchAdd),
    reduce: dispatch(dispatchReduce),
  };
};

export default connect(mapStateToProps, mapDispatchToProps)(Counter);
在需要 redux 的状态时,组件通过connect将状态传递给组件
connect 有四个传参
mapStateToProps?: Function将 state 注入到组件中mapDispatchToProps?: Function | Object将 action 注入到组件中mergeProps?: Function在前两个传参的返回和 ownProps 作为传参,返回合并后的 propsoptions?: Object自定义传入的 context ,是否是需要比较前后状态以及比较的方法,转发 ref 返回原组件还是包装后的组件
大部分情况下我们只使用到前两个方法(本文也只会讲述这两部分)
通过上面用例可以知道
Provider负责传递storeconnect负责接收store,并将state注入到组件中
Provider是通过什么进行store传递?
答案是:Context
什么是Context?
简单来说,Context是 React 提供的一种数据传递方式,Context能够自动的自上而下传递数据,不需要像props那样手动定义传递的数据,是一个既方便又危险的属性。'
如果想详细了解Context的详细用法和说明,可以去 React 官网查看文档
三、动手
目标:实现connect和Provider
connect是函数,接收mapStateToProps和mapDispatchToProps,返回hoc
Provider是组件,接收store并通过Context传递给其他组件
import React, { Component } from "react";
import PropTypes from "prop-types";

const StoreContext = React.createContext();

export function connect(mapStateToProps, mapDispatchToProps) {
  return function (WrappedComponent) {
    return class connect extends Component {
      render() {
        return <WrappedComponent {...this.props} />;
      }
    };
  };
}

export class Provider extends Component {
  render() {
    return (
      <StoreContext.Provider value={this.props.store}>
        {this.props.children}
      </StoreContext.Provider>
    );
  }
}

Provider.propTypes = {
  children: PropTypes.element.isRequired,
  store: PropTypes.shape({
    subscribe: PropTypes.func.isRequired,
    dispatch: PropTypes.func.isRequired,
    getState: PropTypes.func.isRequired,
  }),
};
上面就是connect和Provider最基础的定义
再来是connect接收Context,并通过传入的两个 map 方法将需要的state和dispatch注入到组件的props中
...

export function connect(mapStateToProps, mapDispatchToProps) {
  return function (WrappedComponent) {
    return class connect extends Component {
      static contextType = StoreContext;

      constructor(props, context) {
        super(props, context);

        this.store = props.store || context;
      }

      render() {
        return (
          <WrappedComponent
            {...this.props}
            {...mapStateToProps(this.store.getState(), this.props)}
            {...mapDispatchToProps(this.store.dispatch, this.props)}
          />
        );
      }
    };
  };
}

...
到这一步,已经将state和dispatch注入到组件,但触发action后并不会触发组件render,原因在于state变化后并没有重新渲染组件
所以这一步我们需要监听state的变化,并且在确认变化后,触发组件的render
...

export function connect(mapStateToProps, mapDispatchToProps) {
  return function wrapWithComponent (WrappedComponent) {
    return class Connect extends Component {
      static contextType = StoreContext;

      constructor(props, context) {
        super(props, context);

        this.store = props.store || context;
        this.state = {
          storeState: this.store.getState(),
        };
      }

      componentDidMount() {
        if (!this.unSubscribe) {
          this.unSubscribe = this.store.subscribe(
            this.handleStoreChange.bind(this)
          );
        }
      }

      componentWillUnmount() {
        if (this.unSubscribe) {
          this.unSubscribe();
        }
        this.clearCache();
      }

      handleStoreChange() {
        if (!this.unSubscribe) {
          return;
        }

        const prevStoreState = this.state.storeState;
        const storeState = this.store.getState();

        if (prevStoreState !== storeState) {
          this.setState({ storeState });
        }
      }

      clearCache() {
        this.store = null;
        this.unSubscribe = null;
      }

      render() {
        const storeState = this.state.storeState;

        return (
          <WrappedComponent
            {...this.props}
            {...mapStateToProps(storeState, this.props)}
            {...mapDispatchToProps(this.store.dispatch, this.props)}
          />
        );
      }
    };
  };
}

...
在订阅后,每当触发一个action,就会触发handleStoreChange方法,里面将prevStoreState和storeState进行比较,只有触发的reducers返回原本的state时才会是 true
每当action触发state变化时,每个WrappedComponent都会render,即使改变的state组件没有用到,所以接下来需要做一些优化
...

  shouldComponentUpdate(prevProps, prevState) {
    return !(
      shallowEqual(this.state.storeState, prevState.storeState) ||
      shallowEqual(
        mapStateToProps(this.state.storeState, this.props),
        mapStateToProps(prevState.storeState, prevProps)
      )
    );
  }

...
在shouldComponentUpdate中,根据前后的storeState和mapStateToProps的结果来决定是否需要render

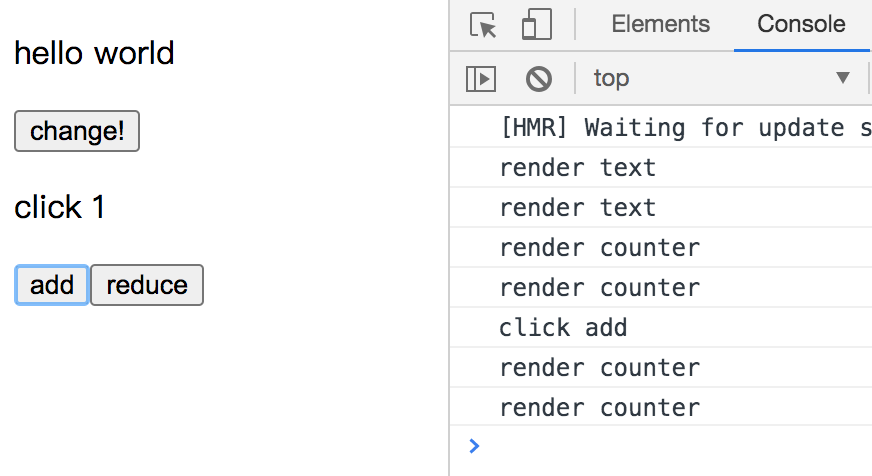
可以看到点击 add 按钮后,只触发了counter的render,达到了预期的效果(这里render两次是因为React.StrictMode,详细可以看issues)
到这步简易react-redux算是完成了
思考
最后总结一下存在的一些问题:
mapDispatchToProps只能传递function类型- 实际开发中大多数都会传递
action creater而不是action,所以支持object类型是挺重要的一点
- 实际开发中大多数都会传递
更新逻辑不应该在
shouldComponentUpdate里这一点在React Redux with Dan Abramov视频里有提到,最初设计时更新逻辑写在
shouldComponentUpdate里,但在特殊情况下可能会导致最后渲染出来不是最新的state(因为本人英语不好,没能理解错误发生的情景,所以就不写出来怕误导大家,视频内 24:59~27:30)问题的根本原因在于 react 是异步渲染,对于多个
setState会合并成一个去执行,而 redux 修改state却是同步,当dipatch时,redux 里的state会立即改变,异步与同步之间的差异导致了问题讲述问题的同时也介绍了新的解决方案,将更新逻辑放在
render里,connect会保留React.createElement生成的element对象,在一系列判断后返回新旧element对象(如果 render 里返回旧的 element 对象,将不会重新渲染)
更新逻辑里每个
mapStateToProps都必须重新执行一遍- 当 mapStateToProps 的计算很重时,每次渲染都要话费大量时间,这是 react-redux 本身的缺陷(reselect解决了这个问题)
